Freezer Friendly Cheesy Beef & Bean Burritos


20160512_154455
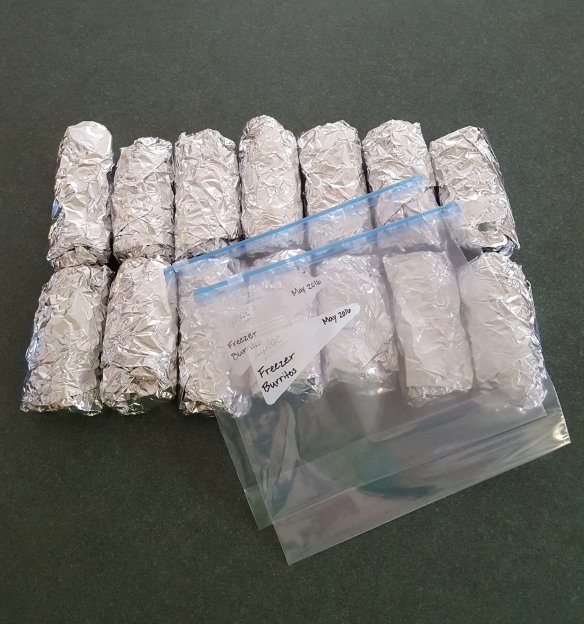
These freezer friendly burritos are ideal for just about anyone!
When we decided to be a one income family we had some decisions to make, especially in the financial department. One of my first thoughts was reducing (maybe maximizing is a better word?) our food budget. My husband’s work has an onsite cafeteria ($$$$!) so it was easy to not worry about lunch for him, however once we truly examined our spending we realized $50+ a week on lunch is TOO. MUCH. So knowing my husband and his love of burritos I knew the answer was freezer burritos! Now, my lovely hubby still has the metabolism of a teenager so these 15 burritos last us ONE measly week BUT they save so much money it’s absolutely worth the effort. Plus I know he’s eating real, homemade food. Also I force fresh chopped veggies and fruit on him, I’m not sure if he’s pitching them at work or actually eating them but his lunch box is happily empty each night. I hope these burritos work well for you, whether they are for lunches or quick and easy week night dinners.

Ingredients 

  • 3lbs ground beef
  • 2 Tbsp olive oil
  • 3 medium onions, chopped
  • 6 garlic cloves, minced
  • 1 pkg taco seasoning (or preferred seasoning)
  • 4 16oz cans refried beans
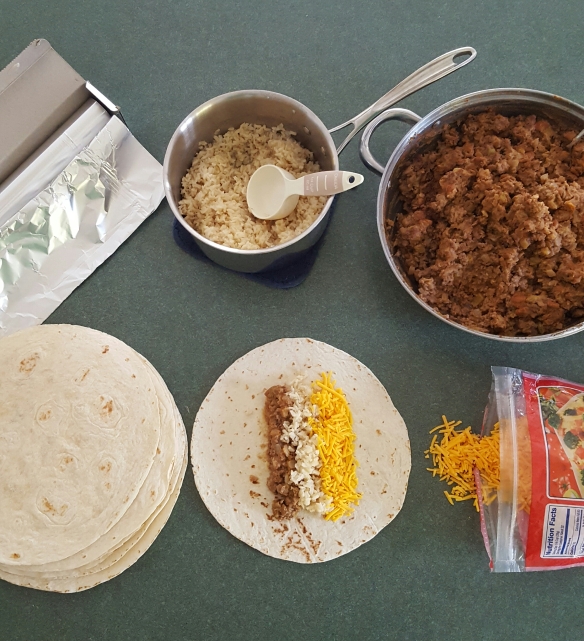
  • 15 burrito size tortilla shells
  • 2 cups cooked brown rice
  • Shredded cheddar cheese

    20160512_154606

Directions

In a large skillet heat olive oil over medium heat, saute onion about 3-4mins, add garlic and saute 1-2 min. Add ground beef, crumbling and cooking until browned, add seasoning, then add refried beans.

Fill each tortilla with ¼ C of the beef & bean mixture and ¼ C rice, plus 3 tbsp (or your preferred amount) shredded cheddar cheese. Fold each burrito with both ends folded inwards.

This mixture will make at least 15 large burritos, probably up to 20 regular size. Wrap each burrito in aluminum foil and freeze inside a zip lock bag.
20160512_154340

Greek Style Quinoa Salad

20160117_1302521
This delicious and super nutritious salad is inspired by those with food allergies, I personally have a few Mama friends that have altered their own diet because their nursing babies have food sensitivities and allergies. So I came up with a crowd friendly, non-intimidating, diary-free, egg-free, soy-free, and nut-free yet still very satisfying dish. This is perfect to munch on throughout the week or, even better, bring to a potluck style party! The quinoa gives this salad a really great nutty flavor, the vegetables add a great texture and pop of flavor, then the dressing really ties it all together with a nice zing. My husband and 2 year old love this stuff, I hope you do as well!

20160117_1154301
Ingredients

  • 3 cups cooked Quinoa (1 cup uncooked)
  • 1 medium cucumber, cut lengthwise and diced
  • 1 medium red onion, diced small
  • 1 green bell pepper, diced small
  • 1 cup grape tomatoes, sliced in half
  • 1 cup parsley, chopped
  • 1 cup black and green olives

For the dressing:
3 Tbsp olive oil
2-3 Tsp apple cider vinegar
Salt and Pepper

Directions

  • Cook quinoa according to package instructions.
  • Chop cucumber in half lengthwise, then cut each half lengthwise again. Chop into bite size pieces.
  • Dice the onion and green pepper.
  • Slice the grape tomatoes in half.
  • Finely chop the parsley.
  • In a separate bowl mix together olive oil, vinegar, and salt & pepper.
  • Let quinoa cool then combine with vegetables. Mix in dressing to taste, I used the whole mixture but use however much you like. Season with additional salt and pepper to taste. 

One Pot Cheesy Rotini & Italian Sausage

One Pot Cheesy Rigatoni and Italian Sausage

I forgot to thaw chicken for what I originally had planned for dinner tonight, luckily I had some Italian Sausage just begging for some attention. I also happen to have plenty of cheese and Rotini… what to do….? One Pot wonder instantly came to mind! This dish is cheesy and sauce-y and oh so delicious!

Cook time: 40 minutes Serves: 6 to 8

Ingredients

  • 1 Tbsp olive oil
  • 1 lb Ground Italian sausage
  • 1 medium onion, chopped
  • 1 green pepper, chopped
  • 4 cloves garlic, minced
  • 1 cup Parsley, chopped
  • Salt and pepper, to taste
  • 2 (14.5 oz) cans crushed tomatoes
  • 3 cups water
  • 12 ounces Rotini (spiral) pasta
  • 1/2 cup grated Parmesan cheese
  • 1/2 cup half and half
  • 1 cup shredded mozzarella cheese

One Pot Rotini 3
Directions

  • Heat olive oil in a large skillet over medium high heat. Add onions and peppers, saute until softened, about 3-5 mins.
  • Add ground Italian sausage and cook until browned, about 3-5 minutes, making sure to crumble the sausage as it cooks.
  • Stir in garlic and parsley cook, stirring frequently, about 1 minute; season with salt and pepper, to taste.
  • Stir in tomatoes and bring to a simmer until slightly thickened, about 8-10 minutes. Stir in pasta and 3 cups water. Bring to a boil; cover, reduce heat and simmer until pasta is cooked through, about 13-16 minutes.
  • Remove from heat; stir in Parmesan and heavy cream. Top with mozzarella and cover until cheese has melted, about 2 minutes. Top with chopped Parsley.


Creamy Sausage Vegetable Soup

This soup is perfect on a snowy night! Plenty of hearty vegetables and spicy sausage all in delicious creamy broth. Serve with easy drop biscuits for a meal even picky eaters can’t deny.


12301387_546877635475615_433354897_n

Cook time: 20 minutes Serves: 4 to 6

Ingredients

  • 1 tablespoon olive oil
  • 1 lb. spicy Italian sausage
  • 3 cloves garlic, minced
  • 1 onion, diced
  • 2 medium carrots, peeled and chopped
  • 2 stalks of celery, chopped
  • 1 small butternut squash, peeled and diced into 1 inch pieces
  • 4 medium potatoes, diced (I leave the skin on)
  • 1 tsp fresh Sage, optional
  • 1 tsp fresh thyme, optional
  • 1/2 teaspoon dried oregano
  • Salt and pepper, to taste
  • 5 cups chicken broth
  • 1/4 cup heavy cream

Sasuage Vegetable Soup2

Directions

  • Heat olive oil in a large stockpot over medium heat. Add Italian sausage and cook until browned, about 3-5 minutes, making sure to crumble the sausage as it cooks; drain excess fat.
  • Stir in garlic, onion, carrots, celery, sage, thyme, and dried oregano. Cook, stirring frequently, until onions have become translucent, about 2-3 minutes; season with salt and pepper, to taste.
  • Stir in chicken broth and bring to a boil. Add butternut squash and potatoes, simmer on medium high heat until tender, about 10-12 minutes.
  • Stir in heavy cream until heated through, about 1 minute; season with salt and pepper, to taste.
Sasuage Vegetable Soup3

Sasuage Vegetable Soup1

Enjoy!

Notes:
Adapted from (Damn Delicious)

Roasted Chicken with Red Potatoes and Green Beans

So light but packed with flavor!
The chicken has a slight citrus flavor from the lemons that really brightens up this dish while the potatoes and green beans cook perfectly with the olive oil and garlic coating making this meal filling and satisfying. You could do this with chicken or pork, but either way you should try it tonight!


Roasted Chicken with Red Potatoes and Green Beans


3-4 chicken breast
1 lb fresh green beans, ends removed
3-4 red potatoes, diced
4 Garlic cloves, chopped
Fresh parsley, chopped
2 lemons. 1 sliced, 1 juiced
5 Tbsp olive oil
Salt/pepper

Slice lemon and place slices in bottom of dish.
Add olive oil, garlic, lemon juice and salt/pepper to bowl.
Put green beans in oil mixture, coat and place on top of lemon slices in dish.
Repeat with potatoes, place around edges of dish.
Repeat with chicken and place in middle of dish on top of green beans.
Roast at 400° for 50 mins.

Sausage and Peppers Sheet Pan Dinner

Sheet pan dinners are one of my all time favorites, talk about simple!
This dish can be made spicy if you use sausage with spicier herbs or it can be sweeter if you use a milder sausage, either way it is delicious!


OLYMPUS DIGITAL CAMERA


16 oz. Sausage of your choice
1 Red Bell Pepper
1 Yellow Bell Pepper
1 Medium Onion
3-4 small Red Potatoes
2 Cloves of Garlic, chopped finely
2-3 Tbsp Olive Oil
Salt & Pepper

Cut sausage, peppers, onion, and potatoes into 1 inch bite-size pieces, add to sheet tray.
Add finely chopped garlic.
Drizzle Olive Oil over everything, and toss to coat well.
Finishing with the salt and pepper and tossing one more time.
Bake at 425° for 35-40 minutes.
Serve in a heap because it will be gone in a flash!

Make your very own healthy, nutritious, and affordable baby food.

Here we have Avocado, Sweet Potato, Steel Cut Oatmeal, and Peaches.

Your very own baby food!

Your very own baby food!

I start by peeling, chopping, and dicing each fruit and veggie.

10380284_10201888108514929_3794236340324894034_n

Avocado:
-Peel, dice, and puree: 1-2 Ripe Avocadoes.
You can add a liquid such as water, breast milk, or formula to thin the mixture.
(Tip: use knife to remove seed by diving knife edge into seed and twisting to remove)

Sweet Potato:
-Peel, dice, steam, and puree: 1 Sweet Potato.
After peeling & dicing, steam sweet potato either in a steamer or in a pot of water with a simple steamer basket (my preferred method.) One you’ve reached a soft consistency, usually I poke with a fork and if it slides easily through I know we are good to puree, then puree until smooth. *Can add breast milk to thin the mixture.

Steel Cut Oatmeal:
-Grind & Cook: 1/2 C. Steel cut oats and 1.5 C. Water
With the steel cut oats you will need to grind them into a fine powder before cooking. I used my Baby Bullet which worked great! After grinding into a powder you will need to boil while stirring almost constantly. Good idea to make a big batch of this!
Add powdered steel cut oats to boiling water, turn heat down to simmer and cook 10-12 mins.
When serving to baby *Can add breast milk to thin the mixture.

Peaches:
-Peel, dice, and puree: 1-2 Ripe Peaches
Peaches typically do not need any added moisture such a breast milk. I usually just puree these and baby loves them!

End Result
10484783_10201888195517104_6470067368594491577_n

Enough healthy, homemade baby food to last the week for my amazing 6 month old!

(Please note: I did use the BabyBullet kit in this demo, however it is not needed. You can use any high powered blender, just make sure any large chunks are edible for your little one. Then you can store the purees in ice cube trays, small storage bowls with lids, etc.)